The story is set in Sweden circa the early Viking Age. The plot is best described
as 'Beowulf meets Alien'. Add a science fiction twist to the ancient Saxon story
of hero's and monsters. Make both the hero and the monster from a crash landed
space ship. No technology other than what is local.
For a fan based plot overview - Go on HERE
I had been asked to provide a wide range of historically accurate cookware and
tools. All the pieces were created to 'replica' standards - the forms are based
in most cases on known artifacts. Most pieces are heavily forged mild steel,
with things like arc welds used and then surface dressed to hide them. There
are a wide range of cook pots of various sizes and materials. As well as the
cooking tools described here, there were also woodworking and blacksmith's tools
and oil lamps produced by the Wareham Forge. I took a considerable bit of effort
on the decorative cauldron hanger, as I could see it ending up in a number of
film shots.
The commentary below is pieced together from a number of blog postings on Hammered Out Bits which I wrote during the production of the objects.
DISCLAIMER: Those commentaries that relate to the ongoing
'Outlander' film project primarily confine themselves to technical aspects of
the metalwork, and discussions of the source objects as they apply to the material
culture of the Norse. There is no discussion of the plot or production.
I actually have no knowledge of how any of the pieces I created will be utilized
by Outlander Productions. I have not been given any information about the film,
its production, or any aspects of its visual designs by anyone at Outlander
Productions. The viewpoints expressed here are entirely my own.
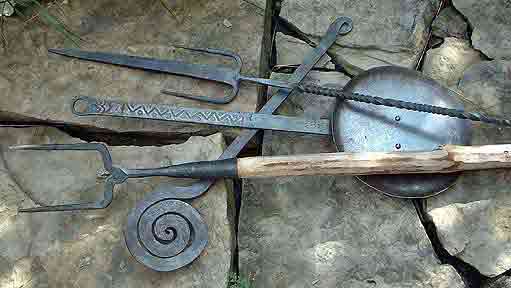
Norse Era Cookware For the artifact prototypes of these objects, and to order copies - see Norse Reproductions & Replicas |
Spiral Iron - Here a pretty standard interpretation
of the few existing artifact samples. All are very small, in the range of
10 - 15 cm diameter. Intended for use in the 'Chieftain' house, mainly due
to the large amount of metal required to form the piece. Dish Iron - There are two of these, each with a dish about 25 cm diameter. One virtually identical to the artifact samples, and intended for a 'Bondi' house. The second has been upscaled to suit the 'Chieftain'. On this piece there is line and dot punch work along the handle. The hanging loop has been created by punching and drifting. It is then detailed with punch work to resemble a human face. Quite intentionally, the handle is forked and the dish is attached to it using TWO rivets. There is at least one artifact sample that uses this method. (Which puts an end to the idea that the dish was rotated during cooking.) Meat Fork - This is replica of a large meat cooking fork, used with a joint of meat which would be supported on a forked stick over the fire. This type is an alternative to a meat spit. The fork is made from a large piece of flat bar, split back and then drawn to points. The remaining bar is then shouldered and pulled to a cylinder. The socket was made separately (from heavy pipe in this case) and then the two pieces welded together. Set on a length of sapling. Meat Spit - This is based on the Lund sword spit discussed in that earlier posting. Again a heavy piece of flat stock is the starting point for the working end. First the long tapered point was drawn out. I decided that this shape would taper in width and thickness, so keeping a rectangular cross section down the length. (Other interpretations often create a diamond cross section, but I can't see this on the artifact images and descriptions.) The base is then split and drawn to cylindrical points, which are then curled forward. The long shaft is made of a piece of square stock - with the two pieces welded together as the last step. |
 |
 |
 |
Oseberg Tripod Replica |
Detail at Top |
Detail of Foot |
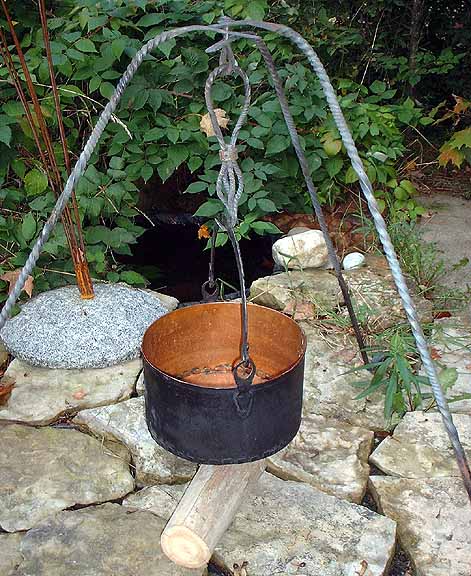
This, strictly speaking, is a replica rather than a reproduction. The measurements
are within about 10 - 15 % of the original artifact, but I worked with a bit
less attention to fine details (exact construction of the basket hook and twisting)
than I would have for a detailed reproduction. I have made versions of this
object a number of times in the past. ( It is not shown as standard item on
the Wareham Forge 'Norse Replicas - Cookware' sheet, but can be custom ordered.)
The source artifact here is the tripod found in the Oseberg ship burial - Norway
circa 825. This is a royal quality object, and I believe the only metal tripod
known from the Viking Age. Both of these facts should be considered when anyone
is considering using this object as the prototype for a re-creation. It is far
more likely that a traveler's camp in the Viking Age would use three cut saplings
and a simple rope and chain trammel combination. (With the living history presentations
DARC mounts, we have changed to reflect
this use.)
There is another 'problem' with this object - mainly that it is barely functional
in a practical sense. There are two aspects to this.
First, the size of the tripod and its integral hook are such that even with
a small sized Norse cookpot - there is hardly any space below the hanging pot
to allow for the fire itself. In the overall image above, the pot seen is a
reproduction (in copper) of one of the pots found in the Mastermyr find. The
piece of wood seen is roughly 10 cm in diameter. Although it does not show as
clearly as I had hoped, there is actually only about 15 cm clearance between
the bottom of this pot and ground level. Certainly not enough to construct a
camp fire. It should be noted that the cauldron actually found in the Oseberg
burial was considerably LARGER than this, and when hung on the tripod barely
clears the ground at all. You would have to dig your fire into a pit in the
ground to use that combination,
This lack of clearance relates to the second problem. Not only does the size
of the tripod cause any cooking pot to hang right on top of the fire wood -
the integral hook does not allow for any adjustment to the height of the pot.
As any skilled camp cook knows, you adjust for cooking temperature by raising
or lowering the pot over the fire.
The overall impression all these factors give is that this tripod was intended
as the * symbol * of a cooking tool, rather than a * working * cooking tool.
For a more detailed commentary on artifacts that may not be quite what they
first appear, see my article 'Aunt Martha's and
Damnthings'.
In the middle is a detailed image of the top of the tripod - folded for carry.
The three legs are joined by a short loop that has been peened over to fix them
in place. Note the use of a square cut spacer (not found on the artifact - but
this gives better action to the hot peening step). The integral hook is formed
of a pinched basket, made up of three individual rods. These are first twisted,
and the longest is folded in half. The ends are then forge welded and drawn
to the terminal hook. The last step is to open up the basket shape and fit a
collar of flat stock at the middle.
The right image is a close up of one of the clawed feet.
Here I have set the foot over a gap in a stone floor to show how the pointed
feet would be pressed into the ground. Two shorter pointed pieces are forge
welded to the main bar, then spread and curved. Note how the base of the foot
is flattened and set at an angle to that of the leg. In use, this tripod has
a fixed configuration, as determined by the angle of the feet and a curve at
the top of each leg (see image above). This means that the tripod also has a
fixed height when correctly mounted (refer to cooking use discussed earlier).
 |
 |
 |
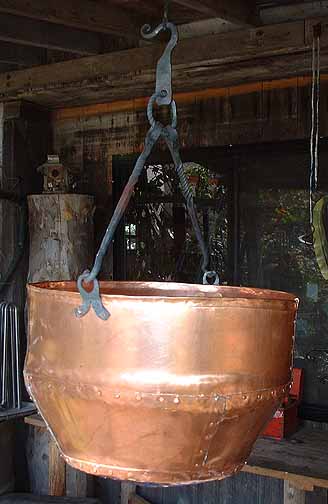 |
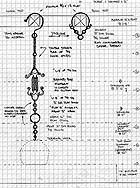
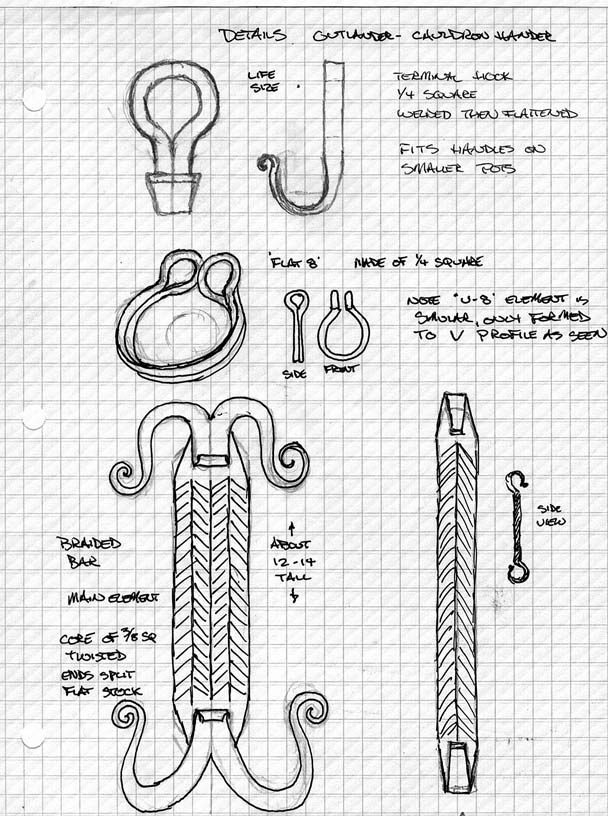
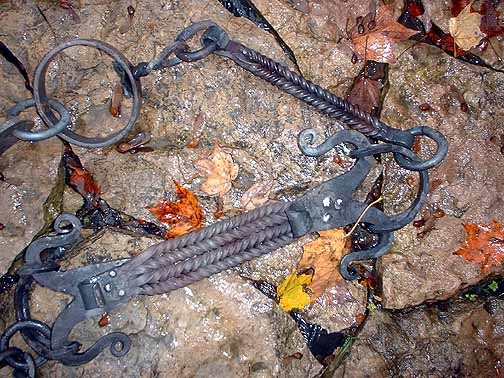
This copper cauldron and its decorative forged hanger was the largest
of the pieces I made for the Outlander production. In use it is intended to hang off a main house beam roughly 8 inches in width, at a height of 8 1/2 feet above the floor. The most likely pot it will be used in combination with is the large copper cauldron also shown at left. I have made a number of different pots for the production, and designed the hanger to allow for use of any of the various different sizes. Quite intentionally, I made limited use of round profile stock, sticking instead to square or flat as would be more likely for a smith during the Viking Age. The overall inspiration for the hanger is the artifact found in the Sutton Hoo ship burial, which dates to 625 AD. This is a saxon royal burial, but decorative chain hangers have been found in a number of Viking Age burials as well. Although the Outlander hanger is shorter than Sutton Hoo, I used a number of the same chain elements in its construction. I wanted to take special care in the detailing on this specific object, as I suspect it may end up featured in some of the filming. Historically, these highly elaborate forgings were status symbols and presentation pieces, hanging in the central focal point of the hall over the fire. |
 |
In the overall photograph, you can see the flow of the elements. The hanger
has been designed with a large hook at the top to allow for easy installation
and removal from the beam. Bellow this is a roughly 4" diameter ring
with a swivel mounted in it that allows the lower chain to rotate. Below the swivel, there is a straight bar unit. This element is made of two bars, each of 3/8" square stock which have been twisted in alternate rotations. The ends of the bars are then forge welded, and the block flattened and folded to a small hook. Rings made of 3/8" round join the completed element to the chain. |
 |
 |
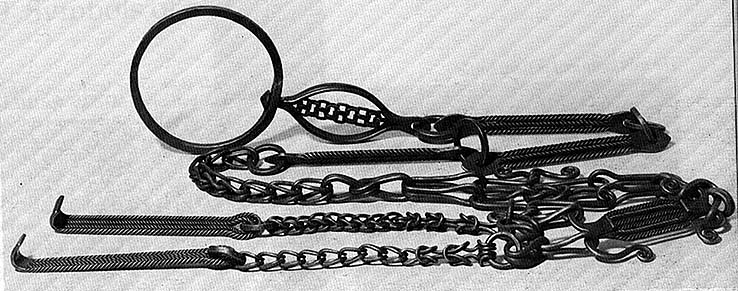
The most elaborate elements of the series are next. In use, this large
bar and hook piece will hang at roughly eye height of the standing viewer.
The form of this element is a bundle of four alternately twisted rods, forged
to shape much the same as the single bar element described above. This unit
is attached to a pair of spiral hooks at each end by means of three rivets.
The individual hooks are formed from a piece of 1 1/2 x 3/16 " flat
bar which was slit at one end and then drawn out. The two points were then
formed to the reversal curve hooks. The opposite end was then drawn down
to a taper, and this also formed into a curve. On the lower unit, that terminal
curve is large enough to hook up the lower chain. On both ends of the bar and hook element are a matching pair of 'flat 8' rings. These are formed of 1/4" square. First a large circle is formed and welded. This is then folded in half. The two folded ends are opened up to a small circle, and the balance of the curved half circle is tapped tightly closed. Again this is an element taken from the Sutton Hoo prototype. |
 |
Just below the bar and hook element is a short length of chain made from
a set of 'flat 8' style links joined by simple circles. The decorative links
are similar to those described above, but in this case the finished link
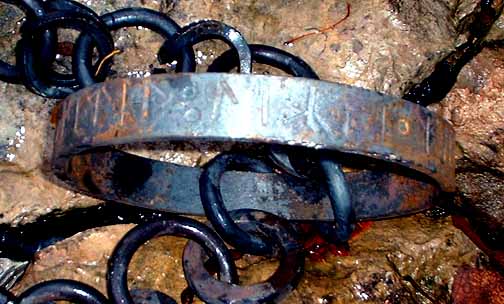
is a roughly 3 inch circle. The lowest part of the chain is the working end, and is a simpler set of alternating round and square stock rings. It ends in a hook, formed from folding and welding a length of 3/4 x 3/16" flat stock. In the centre is a large ring made of flat bar. I decided to sneak something in there for the Viking Age enthusiasts and die hard fans. The exterior of this ring is punched with a short text in runes. The text is in actual Old Norse, and reads: KITIL • KIRthI • MIK / Ketil • Gerthi • Mik / 'Kettil Made This'. To those who have read much of the Wareham Forge or DARC web sites, you will recognize 'Kettil' as the characterization I use in museum presentations. |
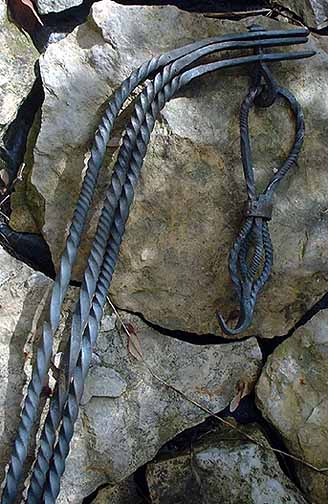
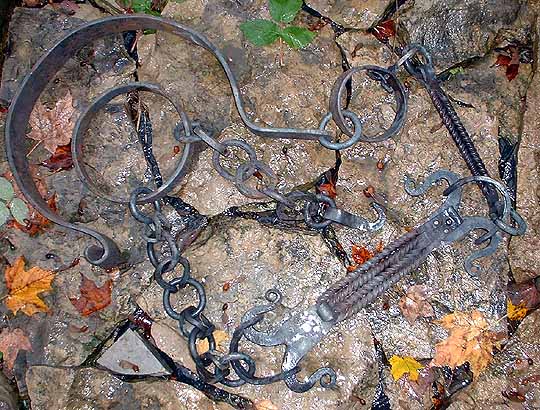
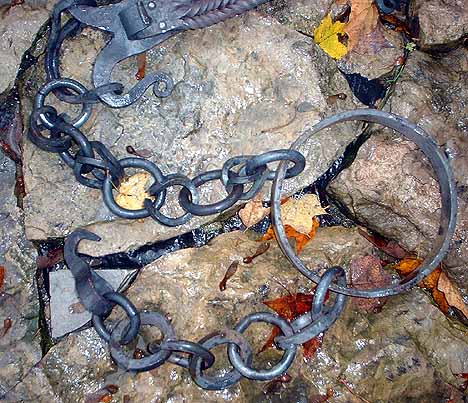
| One of the last projects for 'Outlander' was the creation of twenty feet
of chain ending in wrist shackles. First off, I am not aware of an artifact sample from the Viking Age that could be specifically identified as a prisoner or slave chain. There are a number of lengths of chain - but most commonly these are related to the cooking fire. Cauldron hangers and chain trammels of several types are found from the Viking Age. These range from simple circular or 'figure 8' shaped loops (just pinch the middle of a circle) to extremely elaborate elements found in royal quality burials. For this entire project, the twin factors of design and cost would work directly against each other. The ideal approach would be to hand form and then forge weld each individual link. I would normally charge $5 per link for this work. You can see that the cost of 20 feet (roughly 200 links) would be very high! On top of that there was a time constraint to consider - only about 4 weeks was available for completion of the entire list of objects. In the end I proposed taking a heavy weight commercial chain and re-forging all the links to dress them to a hand worked look. This was considerably less labour than creating each link from scratch. I cut the chain into short one foot lengths, allowing for considerably easier handling of the hot and flexible chain. The end of each link was flattened - specifically in a random and irregular fashion. The short lengths were then joined back together using a roughly 3 inch diameter round link of 3/8 round. One extra thing I did was quench the completed chain from a bright orange heat. Although basically a mild steel material, this quenching served to slightly harden the metal. The reason for this was sound. The completed chain makes a wonderful tinkling noise as it is dragged around! |
 |
| The two terminal ends finished up in a much larger (roughly 4 inch) ring.
At one end this was made from 3/8 square stock - this was the end the shackles
were attached to. The two shackles were attached to a separate two foot length that fitted through the terminal ring, allowing for free motion. The shackles themselves are formed of two pieces of heavy flat stock. Each pair of U shaped pieces ends in the same kind of loop and tab arrangement seen on sea chest hinges. Here the tab of the loop is made over long to allow for a small ring that attaches the chain. The end of the tab is welded back down to the cuff. On the other end are punched a pair of matching holes. Through these is the locking pin. Historically this would be done by inserting and hammering over a rivet. Actors however, and not likely to submit to imprisonment (as much as the director might want to nail them down!) I had to design some system that would maintain the visual feel of the Viking Age - but also allow for quick application and removal. In the end I found a type of blind fastener the ideal size - that's a tube shaped bolt with the threads on the INSIDE. To each of these was welded a roughly square chunk of metal hot cut from heavy stock to give the appearance of a square head rivet. I created two different types of matching bolts. - one round headed and one square headed. These take about 30 seconds to screw in place to secure each shackle. |
 |
 |
|
|
|
| |
|
|
|