The Wareham Forge


Decorative Details

A gallery of possibilities..

The backing cloth used is composed of 1/2" wide squares for scale.

Twist Sample

Twisted Square Sample

A twisted bar is so basic to 'wrought iron work' that the potentials here are often overlooked. First, it is important to recognize the vast difference between forged elements and the machine made, cold formed twists typical of low end commercial work. This sample bar illustrates some of these:
- This bar is solid 1" square, it would be simply impossible to form this heavy material except hot. Most commercial pieces are limited to 3/8 square thick.
- Note how the twists change pitch from start to centre, going from loose to tight. This is done by varying the temperature, thus relative flexibility, of the material over its length. Most commercial pieces will have one constant thread over their length.
- The individual twists can be extremely close together. With careful use of high temperatures, its possible to create something that looks like a machine thread. Commercial pieces would just shear if twisted this much.
- Twisted sections can reverse direction. Again this is done by controlling heat and thus flexibility. Commercial pieces once again simply can not do this.


Square Upright
Upper Detail
Lower Detail
Split Upright
Square Railing Upright
Upper Detail
Lower Detail
Split Upright

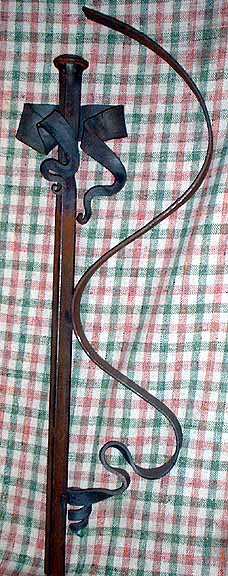
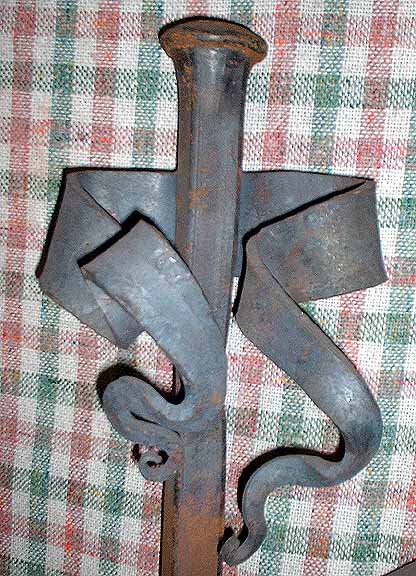
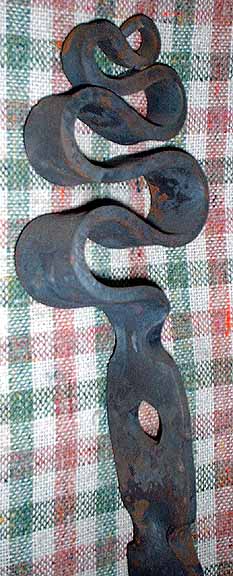
This is a fairly complex element, a prototype for a low deck railing.
The main upright is a length. of heavy wall 1' square tube. Flanking this is a curved piece of 3/16 x 1 1/2" flat bar. In the final version, there would be two of these bracketing the upright, with similar (but not identical) shapes. The handrail would attach to the curved pieces.

The top of the tube has been flared, then covered with a disk of metal which has been dished slightly before being welded into place.
Below this a length. of 3/16 x 2" flat has been forged to a ribbon and welded to place. Either end of the bar was drawn to a long taper, then folded into a series of reversal curves.
The square bar has been drilled, then the hole expanded by drifting open, slightly deforming the shape. In the final construction, a length. of 1/2" round rod would pass through this hole.

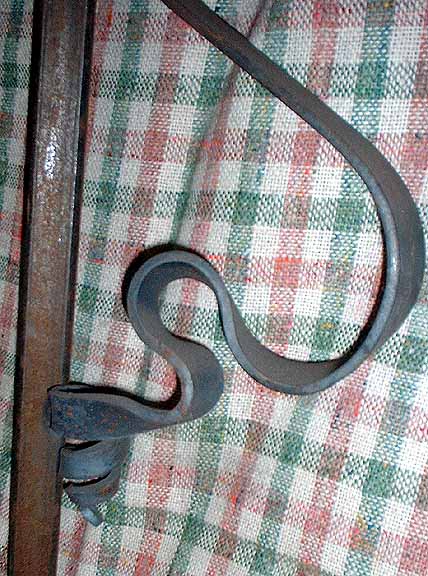
The lower end of the bracketing piece was drawn into a very long tapering point. This was then wrapped into a conical spiral. The contour was finished by reversal curve leading into an S shape. (Far more interesting than a standard scroll!)

This element is made of a heavily forged length of 3/16 x 1 1/2" flat.
At the top, the bar is split in two, each section then drawn to a long tapering point. Each is then wound into a spiral in opposite directions.
Below this, a central split is created by folding the bar, cutting back (slightly to one side), then unfolding the bar. The gap is opened and the two sides profiled.
At the base, the bar is crimped, resulting in a distinctive 3-D shaping to the metal.


Upper Detail
Basket Terminal
Lower Detail
'Spine' Upright
Upper Detail
Basket Terminal
Lower Detail

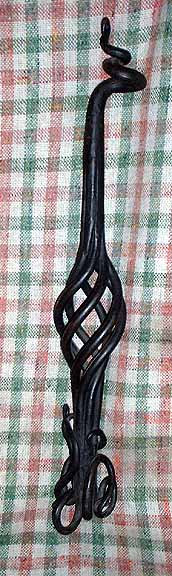
This element is forged from 1/4 x 1 1/2" flat stock.
The main body of the bar has been crimped about every 3 inches. Between each of these, the bar has been hot punched, then the holes drifted open to about 1" diameter. The combination completely alters the crisp lines of the original bar.

The top section of the bar has been drawn out to a very long tapered point. This has then been folded up into a series of reversal curves.

This is an element that could only be created using traditional forging techniques. Imagine this as the terminal on a four poster bed!
A bundle of 3/8" round rods have been forged welded together at top and close to the bottom end. The basket is formed by twisting and then opening up the bundle (a process difficult to control). The forge welding turns the individual bars into a solid billet, which in turn is drawn out into the top to a long conical point and wrapped to the finished curves.

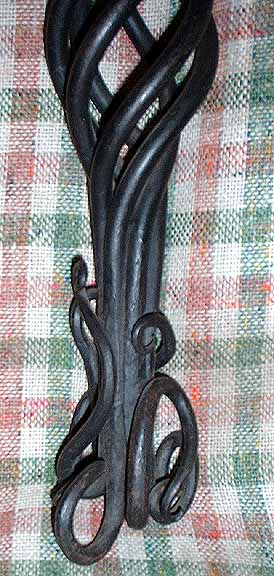
Before the rods were welded together, each was drawn to a long conical point. The last step was to forge each of these into a tendril shape around the base.


Tubing Sampler

Tubing Sampler

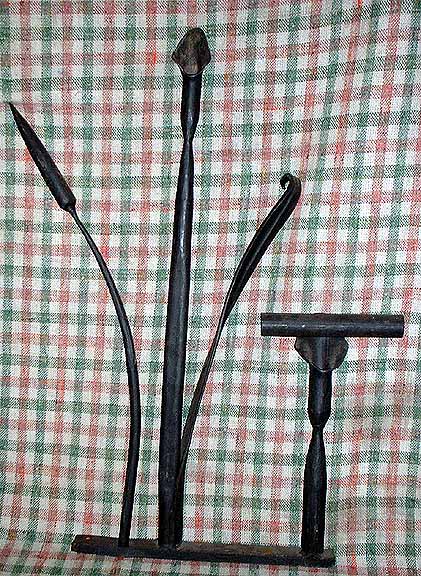
Here is a sampler piece showing a number of organic elements created from pipe and structural shapes. Forging hollow forms takes considerable control and practice to control.
On the left is a Rush. The rush itself is formed from a short piece of 3/4" heavy walled pipe. The end is carefully forged down to a tight taper. Once collapsed tight, the tip is forge welded. After the weld, the taper is continued to create a long sharp point. The rush is finished by shouldering and cutting off the working bar. A length. of 3/8" round is given a conical taper on one end. To complete, the rush is welded to the taper. The resulting graceful shapes are in stark contrast to the 'hot dog on a stick' others commonly use.
In the centre is the basic Lilly. This element is created from a single piece of heavy pipe, in this case 3/4" diameter. The first step is to cut the pipe in a long diagonal. This is then worked over the horn to open and flare it. Just below the tip, the pipe is shouldered, and then tapered into the shoulder. To finish, the upright section of the pipe has been slightly flattened. The second element is a leaf forged from a piece of 1/2" angle. The shape is first flattened, working carefully to preserve a central 'rib'. The tip is drawn to a flat tapering point. To finish up, the bar is curved for a natural contour.
The final element seen is the lilly shape used in conjunction with a length. of 1' dia pipe, as a support for a hand rail.


Punched Upright
Lower Detail
'Lilly Surround'
Punched Upright
Lower Detail
'Lilly Surround'
"Dragon Head"

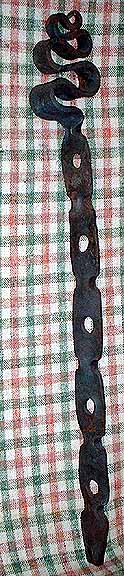
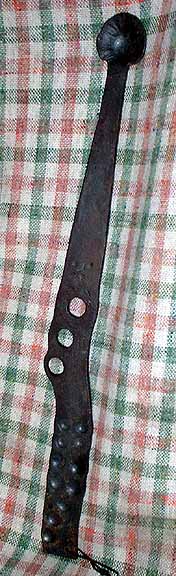
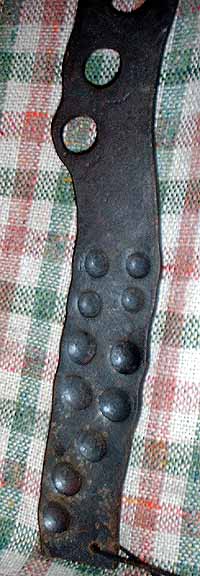
This element is forged from 3/16 x 1 1/2" flat stock.
At the top of the bar, there has been a shoulder forged near the end. The section at the tip is then shaped to a disk. This disk is spread using both ball and cross peen. The finished shape is then dished.
The bar is then tapered to the shoulder.
In the lower section, a number of holes have been hot punched into the bar. These are set off centre, and move closer to the edge as they move down. Each is then drifted open, distorting the side contour.

On the bottom section of a bar, a series of depressions have been stamped into the bar using a ball head punch.

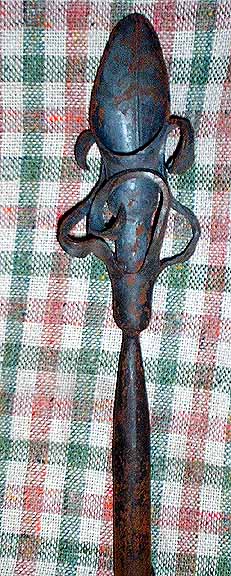
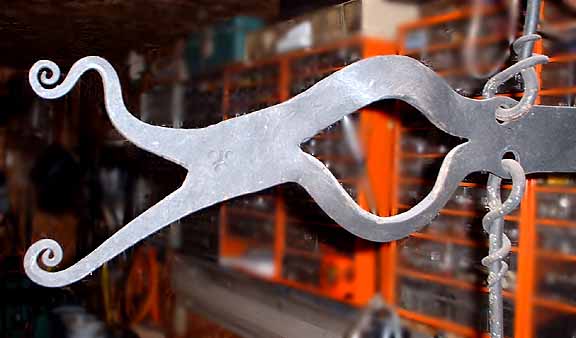
This element uses two individual components both formed from 1' diameter heavy pipe.
The inner shape is the Lilly. This has been created as detailed above. The area below the shoulder tapers out, then back in again at the base. This allows the top piece to fit inside the lower at the final assembly.
The second piece started as a length of pipe which had been cut back on two sides from the tip. This creates four 'fingers', each of which is individually flattened and drawn to a tapered flat point. Once all these are formed, the shoulder and lower taper to shoulder is forged. The last step is curving the four fingers into a tendril halo around the lilly top.

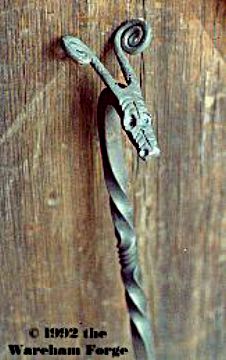
The punched Dragon Head uses a large number of forming steps. This piece was inspired by a pair of Celtic Iron Age fire dogs found in Wales. It forms one end of a long toasting fork. I have not worked very much with 3-D punching, but these time consuming techniques exploit the 'plastic' nature of the hot metal.


'Exploded Channel'
Split Grill
'Feather' Element
Detail
'Exploded Channel'
Split Grill
'Feather' Element
Detail

This element is forged from 1/2 x 1 x 1/8 thick channel stock.
This is a style of work often seen in Art Nouveau designs from the late 1900's - The Paris Metro Station a classic example. Materials like channel stock were brand new then. Talented blacksmiths, working in conjunction with architect / designers, explored the possibilities of these new structural shapes.
Here the end of the U shape of the channel has been cut back along the edges to create three separate lengths of flat bar. Each has been then individually forged to a new profile (tapered point or spread and flattened). These are then formed into sweeping curves and spirals to complete the terminal.

This shows another use of split flat bar, as detailed above. The material here is 3/16 x 2" flat bar.
In this case the ending tapered points are finished in smaller spirals, but left as more of a tendril contour.
The centre split has been cut at about 1/3 x 2/3 of the material, with the lower (1/3) side drawn out considerably more than the thicker upper section. This results in distortion of the bar, here emphasized by dishing the material.
The balance of the bar has a series of paired hot punched holes which were then drifted open, resulting in distortion along the edge. Into these were fitted a series of 1/2" round rods, which form the body of the grill work. Each ends in a long cylindrical point, which is formed into a loop and tendril wrap.

This element is forged from 1 x 1 x 1/8" thick angle.
The shape starts by carefully flattening a length. of the angle. The tip is then drawn to a tapered point. To create the 3-D contour seen, the material is given a series of crimps down its length.

Here is a detail of the lower section of the Feather shape.
The balance of the angle, below the feather, is carefully collapsed into itself to create a roughly circular profile. When complete, no part of the original V shape of the angle remains.
This image also shows the use of simple colour added to highlight heavily sculpted details. In this case a spray of metallic copper paint is added just over the inner surface of the feather.


Backbone
Lower Detail
Spiral Rush
Coppertop
'Backbone'
Lower Detail
'Spiral Rush'
Forged Copper Detail

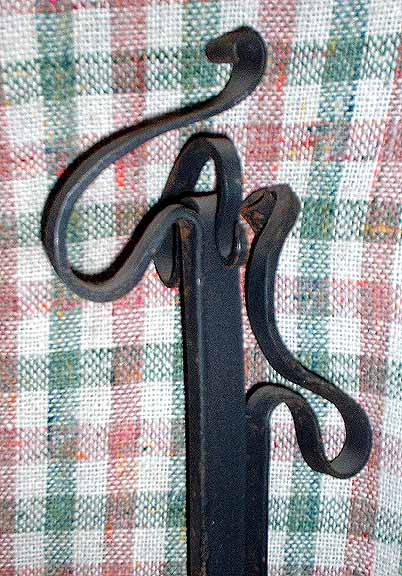
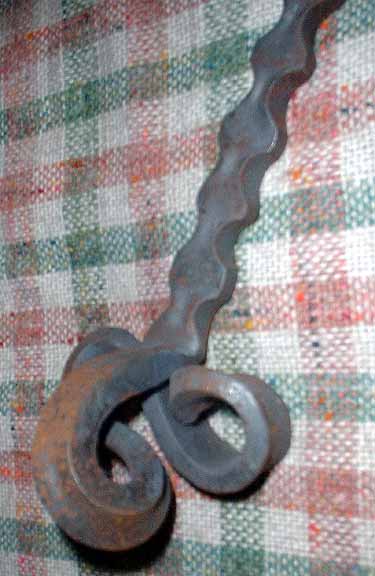
This element shows a more aggressive use of the 'crimp' technique. The parent stock was 3/8 x 1" flat. The individual pinches in the bar are placed quite close together, resulting in a rippling sculpting of the finished piece.

A close up of the terminal 'knuckle'. The way the bar ripples under the crimping is clear. The end of the rod was forged to taper, which was then tightly curved and wrapped into a ball shape. Imagine a series of these forming a spine in a larger sculptural design.

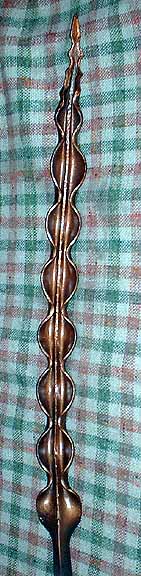
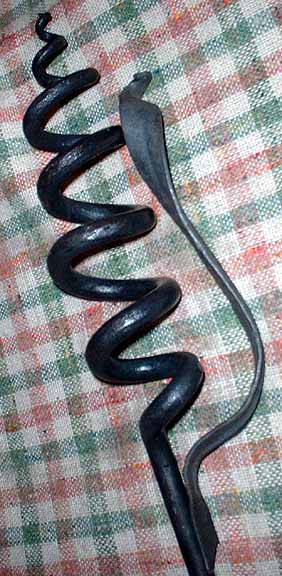
This large spiral is formed from 1/2' round stock. To start, a long cylindrical taper is put on one end. Then a double spiral is forged, fairly large and tight on the terminal end, and then looser and smaller on the shaft end. The last step is to basically pull the spirals open from the point end, adjusting the distances between each loop.
As a finished element, this spiral is bracketed by a bundle of rush leaf shapes. Only one is shown here.
The finish here is matt varathane over the forged metal surface. Note the contrast with the plain fire scale surface on the leaf.

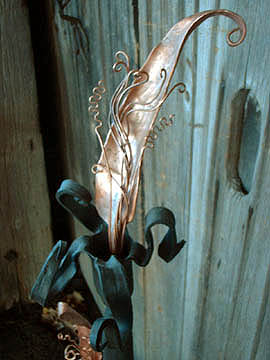
This image shows the possibilities from hot working (forging) materials OTHER than steel. This element created from a piece of 3 /4 x 1/2" solid copper bar.
It is possible to forge the copper alloys - pure Copper and Bronze. Both take careful attention to working temperatures. Either can easily melt at the temperatures created within a forge. Bronze is especially tricky, as it becomes almost instantly brittle and shatters once it drops below forging temperatures.
It is possible to forge Stainless Steel (nickel) alloys. These require considerable more work to form.
Although rarely done - Aluminium can also be worked hot.
All these alternate metals can provide contrasting colours and textures within a design.


Return to:
'On Design'

the Gallery


(Short Cut HERE back to the site index / map.)

All text and images © Darrell Markewitz - the Wareham Forge