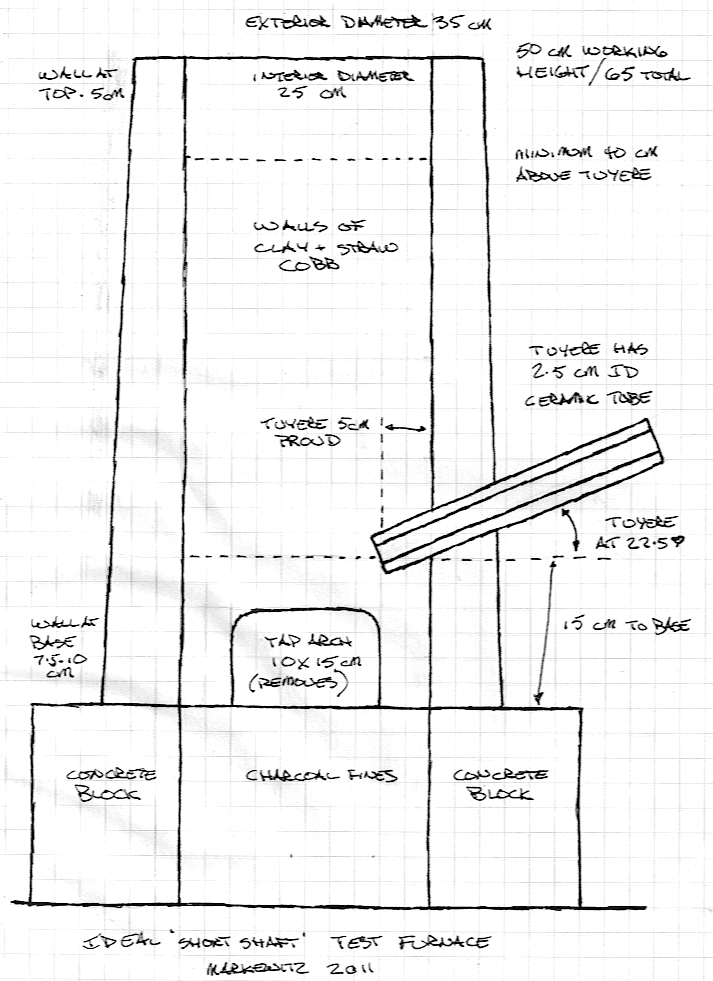
Layout of an 'Ideal' Furnace |
Short Shaft Furnace
|
|
Abstract:
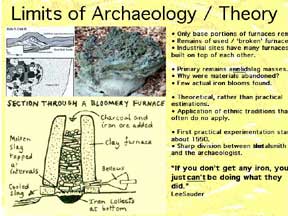
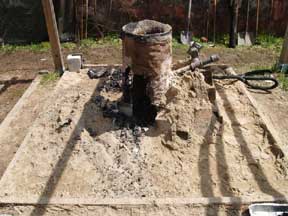
We know that historically iron was made in small bloomery furnaces. Archaeological evidence only suggests the final stages of what was most certainly a complex multi-step process. In Europe, there is no existing living tradition recording the physical methods. It was not until the late 1980's that small teams, often amateurs, made serious attempts to actually smelt iron from natural ores employing ancient styled techniques - the process of experimental archaeology at work. In this program, students will examine the methods of experimental archaeology as they are guided through the process of constructing, then operating, a direct process bloomery iron smelting furnace. In the class room, historic prototypes from various cultures and time periods will be examined. The discussions will focus on the construction and operation of a Norse / Viking Age Short Shaft furnace of the slag tapping type. The will learn how the process functions, and how individual variables can effect the outcome. An extensive hands on experience follows, with preparation of raw materials and building, then firing a working furnace to create (with luck!) an iron bloom. The final aspect is examining the actual working area as an archaeological site, comparing observations after the fact with their own activities.
The Instructor
Darrell Markewitz has worked as a consultant on the Viking
Age, specifically related to museum programing and living history, since the
early 1990's. He designed, built and installed the 'Norse Encampment' program
for Parks Canada at L'Anse aux Meadows NHSC, and 'The World of the Norse' exhibit
for the Cranbrook Institute of Science. Other major exhibit work includes assisting
on 'Vikings - North Atlantic Saga' for the Smithsonian Institution, and 'Full
Circle - First Contact' for the Newfoundland Museum.
As a professional blacksmith, with over 30 years experience, he first became
interested in the problem of Viking Age iron smelting methods as part of a Parks
Canada research team in 2001. Since then he has conducted over 45 experimental
smelts, and has observed as many more, in Canada, the USA and Denmark. This
work has been documented in formal papers and extensively on the Wareham
Forge Experimental Iron Smelting web site. (Refer also to his current CV.)
Layout of an 'Ideal' Furnace |
Short Shaft Furnace
|
|
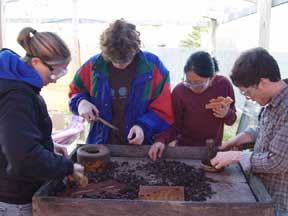
| Class Day ONE - Background : The first day consists of classroom lecture time to explain the two primary aspects of the program: the archaeological background and the technical end. Aspects of the archaeology can easily be delivered by the supporting course instructors, even well in advance of the working days. Suggested topics include: Methods of Experimental Archaeology The Archaeology of Iron Production History and Cultural aspects of Iron Recent Experimentation with Bloomery Furnaces Even if these topics are not covered individually, it will be essencial that there is a lecture presentation covering 'How it works and what we are going to do'. Ideally 2 hours should be set aside for this (1 1/2 hour lecture, plus time for questions. |
 |
|
|
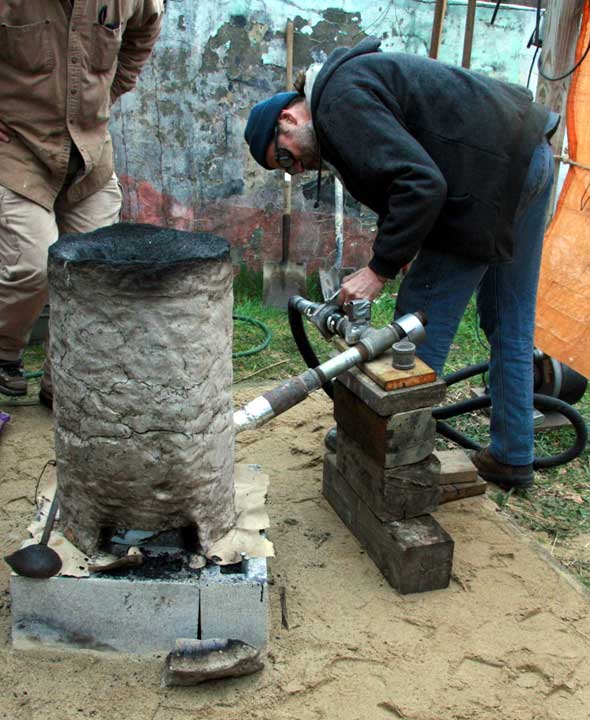
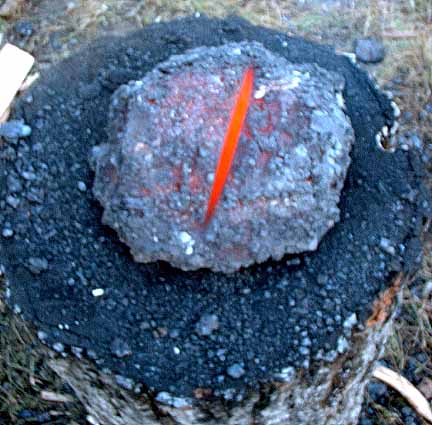
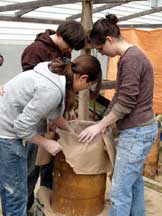
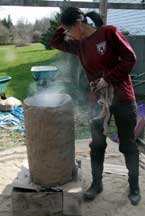
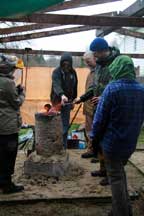
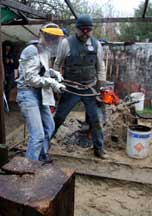
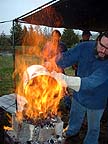
| Workshop Day THREE - Smelting - Safety and Organization, EVERYONE, 1/4 -1/2 hour (depending on team size) - Equipment layout, setting air systems, 1/2 hour - Preheat starts, 1 - 2 people, ongoing 1 hour minimum Once the preheat phase is started, the primary organization is carried out. Once the main smelt sequence starts, there is no time to do this. Confusion around the smelter work area needs to be kept to a minimum, for both safety and efficient working (swift action required to correct ongoing problems). - Main sequence start, 3 - 4 people, elapsed time 4 - 6 hours. Once the main smelt sequence is started, the furnace requires constant attention. 1) Smelt Master - responsible for guiding and modifying the furnace 2) Lead Hand - primarily tool hand off, send set of hands as required 3) Ore / Charcoal adding (although this can be managed by a single individual, in larger groups this can be split to include two individuals) 4) Record keeping - The ideal is to involve students into as much of the actual furnace management as possible. - It should be possible to rotate individual students through these roles, to give as many as possible direct hands on involvement (as opposed to a small number of workers vs large number of observers. - Be aware that if everything goes perfectly, there are long periods where not much is happening save adding charcoal and ore every couple of minutes. However, if a problem develops, there are scant minutes of frantic activity required to correct it! - It is most likely there will be a number of slag tapping cycles to undertake. (Although this depends on the type / quality of the ore and the individual furnace dynamics.) - Extraction / Initial Consolidation Once this phase starts, a smaller number of people will need to make total involvement for each individual task. This phase typically runs over about 20 - 30 minutes, but is the 'exciting' part of the whole process. Maintaining safety will also limit how many students can directly take part. Some tasks do require certain base level skills, so this may limit who gets to participate. (listed by individual per task) a) Clear remaining charcoal, compress bloom in place. b) Open up bottom of furnace, physically extract bloom, place and hold on striking surface. c) Compress bloom (two strikers) On this last, the hope is to have a couple of people with some experience working with hammers, or at least are 'tool users'. Normally one student holding will be holding the bloom. The Instructor/Smelt Master will direct the action with a lighter hammer, with two sledge welding students then 'hitting where the Master hits'. - Clean up (collapse!) Normally 2 - 3 people over about 30 minutes. (Less with more hands) Note that is is usually no more that ensuring the hot debris are safely contained, collecting the large tools, gathering and protecting any fragile or valuable equipment. A normal schedule for smelt day: 8 AM - Instructor on site, initial organization 9 AM - Students arrive on site, safety / organization meeting, site preparation 10 AM - Start of pre-heat 11 AM - Primary smelt sequence starts 4 - 5 PM - Extraction sequence begins plus 30 minutes -Initial compaction hammering plus 45 minutes - Recover, site clean up |
|
- There should be an inner area, directly around the smelter, also roped. This
prevents confusion, also ensures correct safety measures (primarily eye ware)
close to the smelter.
- Note that everyone is going to get quite dirty! Participants are advised to
only wear older, all natural based clothing (absolutely no synthetics in the
work area.) Sparks from the smelter can travel and melt holes in clothing. (A
detailed evaluation of safety requirements can be a separate discussion.)
Note that this is also an ideal 'public' observation special event. In this case the working area would be roped to restrict access beyond the student work team.
| Workshop Day FOUR - Evaluation Involves the whole class, time (estimated) 3 - 4 hours. This is proposed as a class in 'excavation', with students recording the debris field created. This allows them to compare the physical remains with their own known activities. There is no particular reason why this activity needs to be undertaken the next day however. It is suggested to schedule this session before too much weathering has taken place. This activity would be under the guidance of the archaeology instructors, the Smelt Master's direct participation is more to help identify remains. |
 |
For a photo description of 'Archaeology & Experiment' in progress, refer to the smelt report 'Brown 2011'.
Ideally the furnace itself will remain in good enough condition that it
could be re-used with minor repairs. If this is the intent, it should be covered
to prevent water damage. (a plastic garbage can or drum is ideal for this purpose.)
If the whole work area is maintained 'as finished with' it could become an effective
static display, even a teaching tools for future classes to record and evaluate.
Additional Notes:
1) In addition to the teaching days, an further half day will be required on
either end of the program for equipment load / pack out.
2) The ideal location requires a minumum of 30 x 30 feet (10 x 10 m) open ground,
gravel the perfect surface. Concrete slabs can be provided to mount the furnace
on to protect grass or a paved surface.
3) Some overhead cover near to the smelt area is ideal (in case of poor weather).
Tarps for limited rain / sun protection can be supplied.
4) The working area must be directly accessable to vehicles for equipment loading.
A source of water nearby is required (a hose ideal).
5) All basic equipment required is provided.
Program Costs (2011)
Four day Archaeology & Experiment - Iron Smelting program as described
:
Required Materials = $ 100 - $300 (will vary depending on ore type, if charcoal
is supplied)
At your institution = $ 1500 (* plus travel expenses)
At the Wareham Forge = $1200
Custom designed programs are certainly possible on consulation!
* Travel expenses may include mileage, lodging and meal costs, travel time amount.
(Please ask for a specific quote, based on your location)
Listed prices are in CDN funds, and do not include taxes which may apply.
Individuals may be interested in:
This 14 hour session will involve the student in the construction and operation of the 'EconoNorse' small scale iron smelter. On Friday evening students will first assemble the smelter, then a lecture will cover the theoretical and historical background of smelting iron: ores, furnaces, process, equipment. An early start for a LONG day Saturday will start with the pre-heating the furnace. The actual process of the smelt takes roughly 6 hours. After this, the resulting iron bloom will be extracted from the furnace, and given a primary consolidation. The iron produced will be cut to sections and shared between the participants. This program does not require any previous metalworking experience, and is of interest to students of history as well as blacksmiths. |
|

Of interest to working
blacksmiths, the student of history or those attempting to re-create
the Early Medieval period.
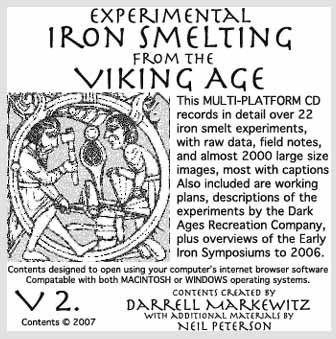
EXPERIMENTAL IRON SMELTING from the Viking Age - is a multi-platform CD-ROM documenting ongoing experiments re-creating both SMELTING and FORGING of the Norse metalsmiths. Contains over 2000 images, working plans, experiment notes and articles. $25.oo each(Canadian Funds
- plus applicable taxes and postage) |