'65 for 65' - Samhain Iron Smelt
October 31, 2020
Wareham
Smelt Team:
Neil Peterson, Rey Cogswell, Richard Schwitzer (compaction) of
DARC
Bram Porter
Smelt Master : Darrell Markewitz
I had been casting around for some direction to head with the long
set of individual iron smelting experiments, now after the better
part of 20 years of undertaking. When my long time
collaborator and smelting partner Neil Peterson was up to
Wareham October 22 (for a day rendering bloom pieces into useful
working bars), he asked what the plan for the normal Samhain Smelt
was.
The last experimental smelt was the 'Bones'
test in June. Although there could be a continuation there,
truthfully I don't feel there is much insight to be gained that
would be worth the investment in materials, time and effort. I had
started some background on early Irish ‘bowl’ furnaces, but not
enough at this point to realistically frame a working experimental
series based on this.
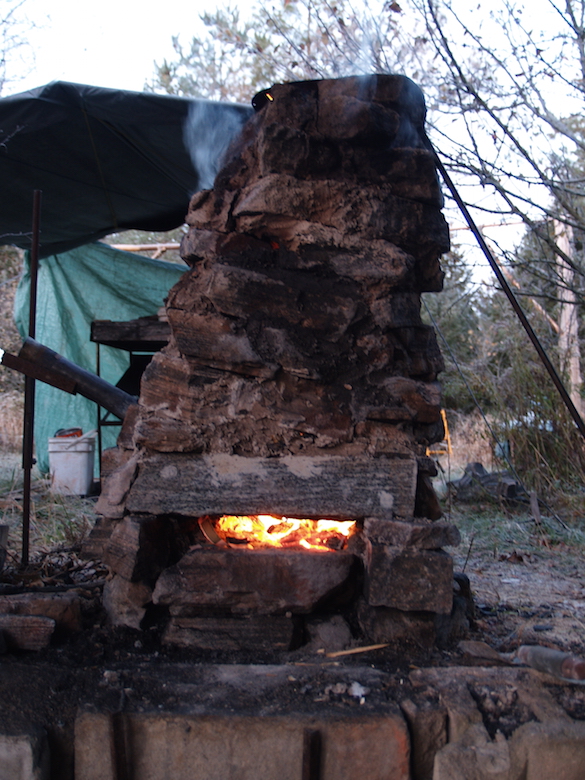
We considered the state of the current test furnace, the stone
block, built for a second Icelandic research project over
2019. ( 1 ) This furnace had been fired four times at that point,
and had suffered some structural damage on its last use (course over
Thanksgiving). Given the shift to colder late fall
temperatures (below freezing at night, mid single digits daytime)
and the general lack of a clear direction forward, I decided to
repair this furnace for one more use, rather than attempt a new full
build.
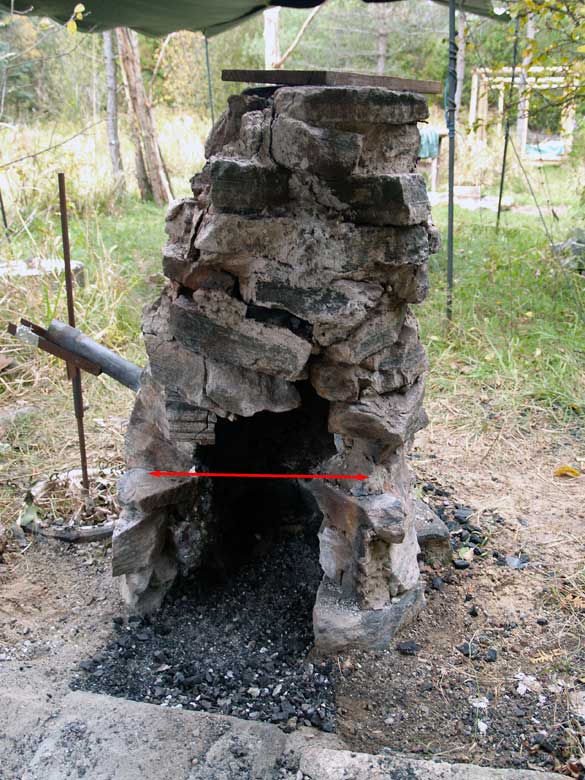 Condition of the stone block after Oct 11 smelt.
The red line is where the original lintel stone (above the
extraction arch) had broken out.
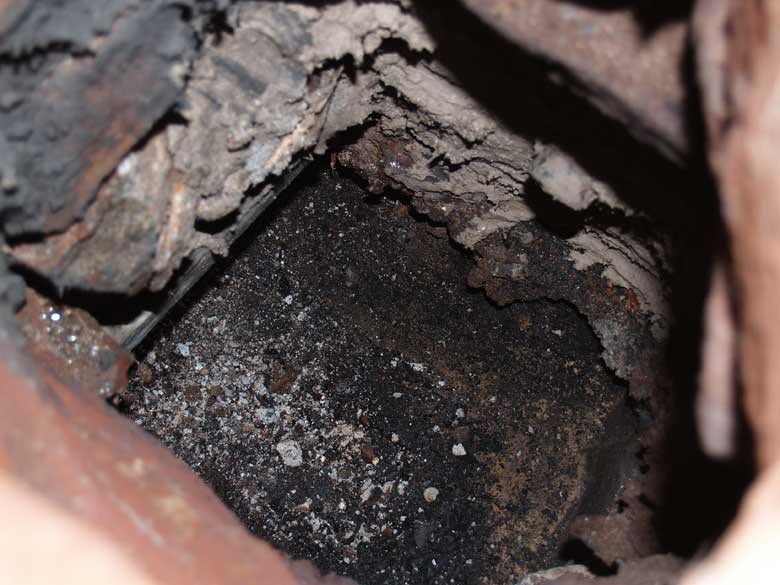
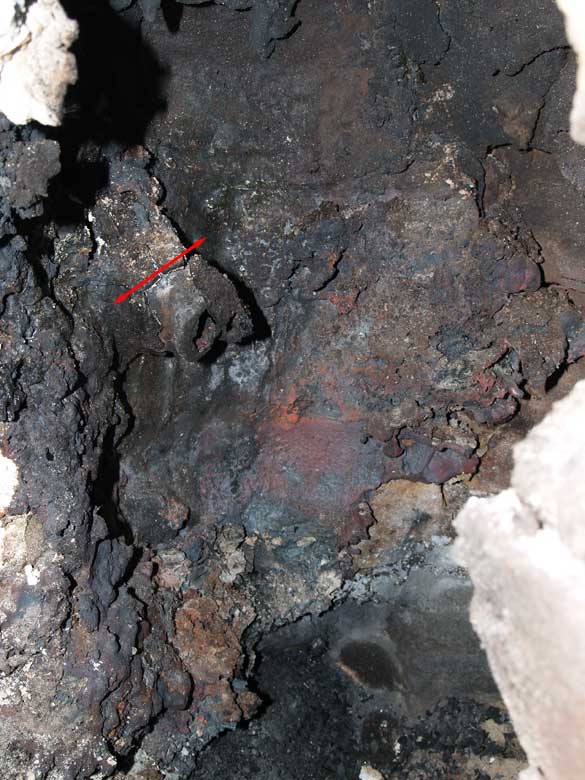 Interior erosion from the Oct. 13 smelt.
When the tuyere was first set, it extended 5 cm proud of
the furnace wall - roughly the red line shown.
I was turning 65 just days after that already long scheduled Samhain
Iron Smelt, set for Saturday 31 October.
With tongue in cheek, Neil said : " 65 in 65. You could smelt 65
kg of ore. "
Now, the largest volume smelts I personally have ever done have been
with 45 kg of ore ( Smeltfest
2006 ). These also resulted in some of the largest blooms,
into the range of plus 20 kg. Attempting 65 kg could potentially
increase everything by 40 %, importantly the amount of charcoal
consumed and raw working time required ( 2 ). Bloom yield also can
increase steeply with larger ore amounts. I was not really sure the
furnace on hand would contain what (hopefully) would be such a
massive bloom!
I have commented a number of times about the problem we have here at
Wareham, perched as we are at the top edge of the Niagara
Escarpment. This is basically a block of solid limestone, in the
range of 100 meters thick, that runs about 750 km from north to
south, and almost that wide east to west. ( see
blog post ) Although there is certainly iron traces in the
well water at home, the physical geography just does not permit
formation of any iron ores.
For that reason, my own experience has lead having had to work with
a great number of both types and qualities of ore, perhaps
more than any other experimental team ( 3 ) :
- Primary Bog Iron Ore / Newfoundland : 2 smelts /
‘Guldager’ & ‘Heltborg’, Denmark : 4 smelts
- Limonite / Lexington, Virginia : 22 smelts /
‘Macaulayite’, Scotland : 1/2 addition / ‘Lecht’, Scotland
: 1 smelt
- Industrial Taconite / Ontario : 9 smelts / Michigan : 1
smelt
- Hematite Grit / Quebec : 6 smelts
- Analog (mixes of Red & Black oxide +) : 36 smelts
- Gromps : 2 smelts
The standard here for some time has been our own ‘bog
ore analog’, composed primarily of red iron oxide powder
(Fe2O3). This material was developed originally in an attempt to
copy the chemistry and physical structure of the primary bog iron
ore found at L’Anse aux Meadows, Newfoundland, as part of the ‘Vinland’
experimental series.
Just recently, the metal bands on wooden barrel slack tub failed.
One of the 'mystic' things at the Wareham Forge is that this tub had
never been emptied since I set up the forge here back in 1990. (The
first filling included some water gathered from the point where
Black Duck Brook mixes with the ocean, just downstream from the
Smelter Hut at L'Anse aux Meadows.) In the process of replacing the
bands, some of 30 years of accumulated iron forge scale was
collected. This material, 2.5 kg, had been added to the analog mix
being made in preparation for Saturday's smelt. Additionally, recent
forge scale, magnetically gathered after working sessions, was
included. The scale portions would be largely Fe3O4, but were
certain to contain a certain amount of silica (in the form of dirt).
This mix would be considered to be DD1A3 :
- red iron oxide ± 22 kg (bag broke moving it!)
- whole wheat flour = 2.5 kg
- slack tub scale = 2.5 kg
- forge scale - 4.5 kg
- Potential Total = 31.5 kg (dry)
This all was mechanically mixed, then water added to make a paste,
that spread on trays. Drying this mixture proved a problem, with the
cool and wet weather. The trays were set under heat lamps for a week
to dry them.
A 100 gm sample was set aside. This was (later) baked at 230 C (450
F) for 15 minutes to drive off the remaining water. The result was a
loss of 4 gm, so ore amounts could be adjusted to reflect this 4%
amount. (Note of this is sometimes made, but normally ore totals are
not adjusted, but recorded as individually weighed out before adding
to the furnace.)
Against Neil’s (off handed) suggestion, it occurred to me that I did
have amounts of most of the other ore types we have worked with
actually available. ‘Duplicating History’ suggested starting
with limonite (pretty much were we originally started, and a tribute
to Lee Sauder and Skip Williams). The only major
type from the list above that was missing was industrial taconite
which was the next ore body we worked with. Next was hematite,
available easily here in Ontario at that point as sand blasting grit. A main
type would be a batch of DD1A3 analog. I also had a quantity
of small quantity of gromps ( 4 ). Last additions would be more of
the previously roasted limonite, enough on hand to complete a
possible total to 65 kg.
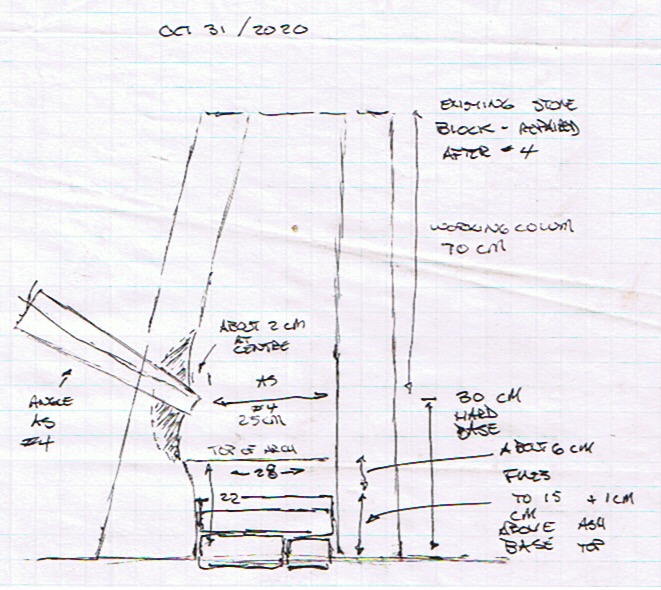 Initial set up of the furnace (layout drawing)
Past
use of this specific furnace has shown it will accept
alternating 2 and 3 kg charges at the end (this against standard 1.8
kg charcoal amounts, burn rate averaging 14 minutes.) The stone mass
has been found to take significantly longer to come up to working
temperature (in the past about 2 + hours). With our normal roughly
30 kg ore amounts, the elapsed time of the main sequence has been in
the range of 5 hours. That all suggests an attempt at a 65 kg smelt
would add about another 3 - 3 1/2 hours to the main smelt sequence,
suggesting a total experimental time (first pre-heat to final
extraction) of 12 1/2 hours. Because of this expected long
duration, I was out starting the initial preheat at just after 7 AM,
before dawn that morning!
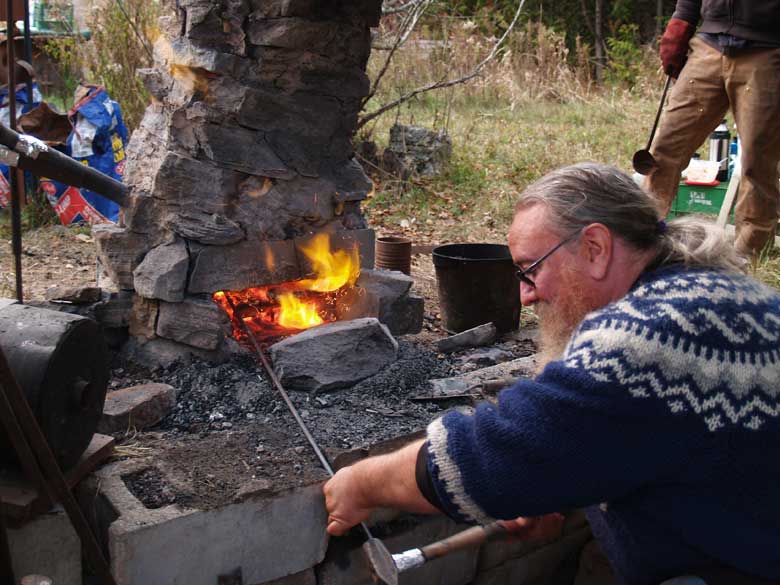
Interior patching around the tuyere. New
clay shows as the light grey material.
Exterior repairs, during initial pre-heat.
New lintel slab and additions (compare with image from
10/14 seen above).
You can see the height of the charcoal fine / ash layer
base (equal to the lower flat stones).
The first (ungraded) charcoal was added at 9:35, making the pre-heat
phase using split spruce lumber pieces a full 2 hours. A first
full bucket was added, which filled the bottom to just about tuyere
level, this was allowed to fully ignite off the remaining coals of
the wood pre-heat. Then followed up with a further 4 buckets to
completely fill the furnace. The combination of the large pieces of
charcoal, and the extremely jagged stone interior, served to cause
the initial charcoal charges to hang up in the interior. The
charcoal was lightly probed several times over this initial ignition
phase so the fuel would correctly settle.
One thing that had become apparent over the last several smelts is
that the sliding gate used to control the volume of the blast had
started to seriously bleed air. (For the number 86 smelt, the gate
had been set at ’1200 LpM’ - and still the burn rate averaged 14
minutes / bucket). Working as much by blast sound as anything else,
this time the gate was set to the marked ‘900 LPM’, but taped over
to stop any air leakage. ( 6 ) The effect of this repair was clearly
seen, with the burn rates over this smelt averaging a very
consistent 12 - 13 minutes per bucket of 1.85 kg oak charcoal.
In keeping with our current ‘best practice’, a total of 3 kg (6.5
lbs) iron rich tap slag would be added as initial ‘bowl forming’
charges. ( 5 ) It was expected that between the extra silica in the
limonite, expected erosion of the clay added to the interior of the
furnace to repair it, that there would be a fair amount of slag
generated and requiring taping over the sequence.
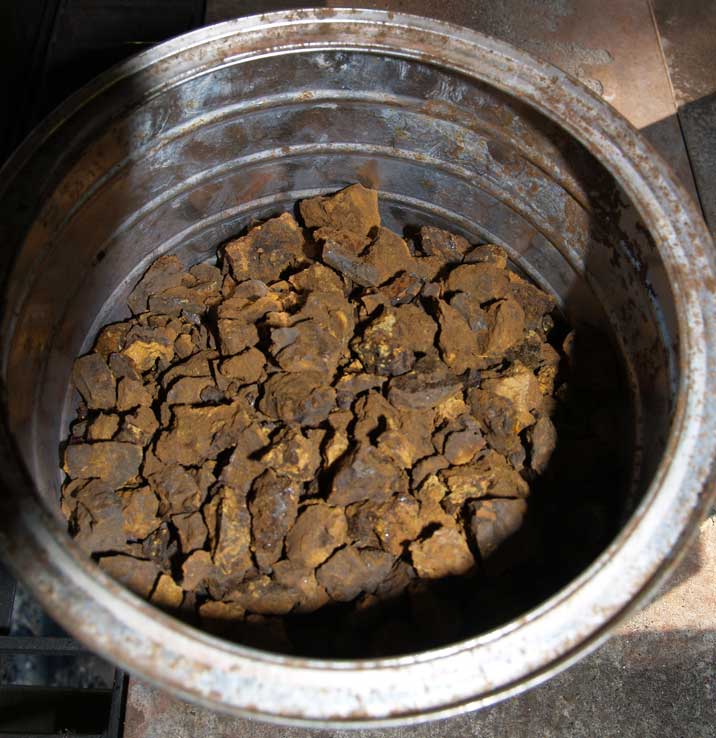
‘Lexington Brown’ Limonite - roasted and broken into ‘rice
too peanut’ size
The first series of ore charges was a total of 6.5 kg of limonite.
The ore on hand, does tend to be on the lower iron content side
compared to the other ore types. This had certainly was the case in
past uses of the materials I had personally gathered, mainly
due to lack of experience spotting the most suitable rocks. This
higher slica content (hence slag formation) was expected to be
balanced with the hematite, which if anything tends to be too ‘dry’
(lacking in silica for slag formation). Individual charges started
(as usual) at 1 kg per standard bucket, increasing to 1.5 kg each
Not too surprisingly, about the time the first set of limonite
charges were complete, observation of the furnace suggested the
initial slag level was sitting a bit to high, and the developing
bowl was probed to both drain it slightly, and to get the hot slag
to settle lower into the furnace.
 Hematite Grit being added
The next series of charges was the granular hematite. Again a total
of 6.5 kg was added. Now at 1.5 kg ore per bucket, four charges were
all it took.
‘Other types’ - Industrial Taconite / DD2 / LAM Primary
Bog Ore
To round out the ‘history of smelting’, samples of the other ores I
had worked with were added, before the start of the DD1 analog. This
included a pellet of industrial taconite (from Defasco, Hamilton). A
piece of DD2 analog, which is primarily composed of black Fe3O4
oxide powder. Finally a small piece of primary bog iron ore, gathered
from Black Duck Brook at L’Anse aux Meadows, just upstream
from the Vinland site.
The bulk of the ore added was the DDA3 analog as described. By the
point in the smelt when this started (roughly 2:45 into the main
sequence) individual charges had increased to 2 kg per bucket. It
was found the burn rate stayed quite consistent with altering 2 and
3 kg charges. A total of 31.5 kg of analog would be added
(which actually works out to 69 lbs).
To round out our ‘history’ the next charges were addition of smaller
pieces of collected groups. Here again the total was 6.5 kg. Due to
the high metallic iron content, the size of individual charges was
reduced to 1.5 kg.
Neil tapping slag in the later stages of
the smelt
By this point it was clear that the slag bowl was sitting higher
than ideal. The stones blocking the tapping arch had been pulled
free, and a number of times a hole was poked into the upper part of
the slag bowl draining the slag level to ensure the air blast would
remain clear. The charcoal fines packing was scrapped clear, with an
attempt made to let the hot slag run into the additional 10 cm space
this had taken. The hope was that this would allow the slag bowl to
settle, creating more room for what was clearly a very large bloom
to accumulate even further.
After the main set of differing ore types had been added, the total
was 45 kg (not including the gromps). As the furnace was still
operating well, and there was still plenty of charcoal on
hand, it was decided to continue towards a total addition equal to
65 kg. There was still a good quality of roasted limonite, partially
broken, on hand. A further total of 13.5 kg, mainly as larger 3 kg
per bucket charges was added.
With what has also become our standard method, a further two buckets
of charcoal were added to cover the last ore charges, to ensure any
reduced iron would be able to settle and adhere to the bloom.
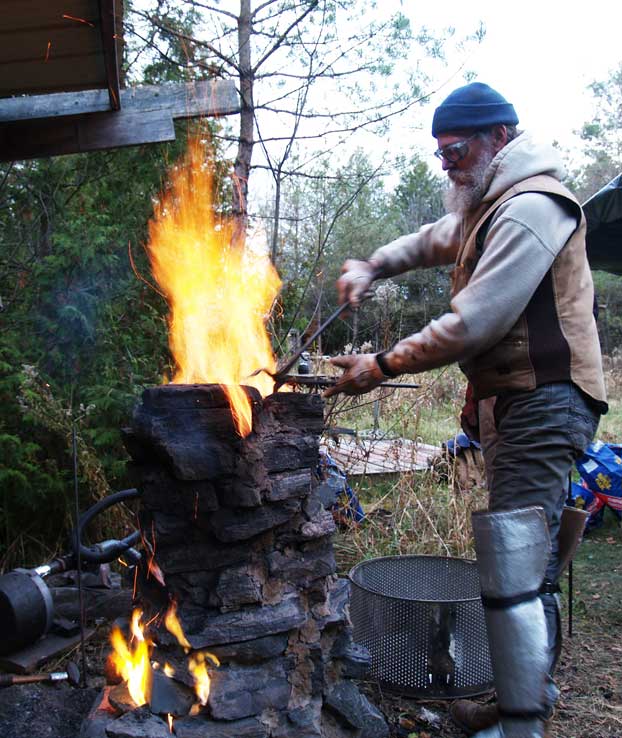
Starting to dismantle the furnace
It was obvious that this would be an extremely large bloom,
especially compared to our work over the last decade, where 3 - 5 kg
were the normal goal ( 7 ). It was clear that there would be no way
to get the huge bloom / slag mass out through the bottom opening
available. It was also felt there was no reason to retain the
furnace itself, in fact there might actually be something to be
learned by dismantling it, block by block. After the charcoal
level had dropped down about 25 cm, individual layers of the stone
blocks were pulled off. These were dropped in a metal container,
partially for safety, but also to simulate what would be likely to
happen in historic process. ( 8 ). This process of allowing the
burning charcoal to drop below a line of stones before pulling a row
off continued, until the level just above tuyere height was reached.
 Furnace stack as fully dismantled
With the last charcoal barely covering the upper bloom, an attempt
was made to compress in place, using the log ‘thumper’. Despite a
good attempt, it was clear than not a lot of effect was being made
to such a large mass of iron - even at this, it’s hottest state.
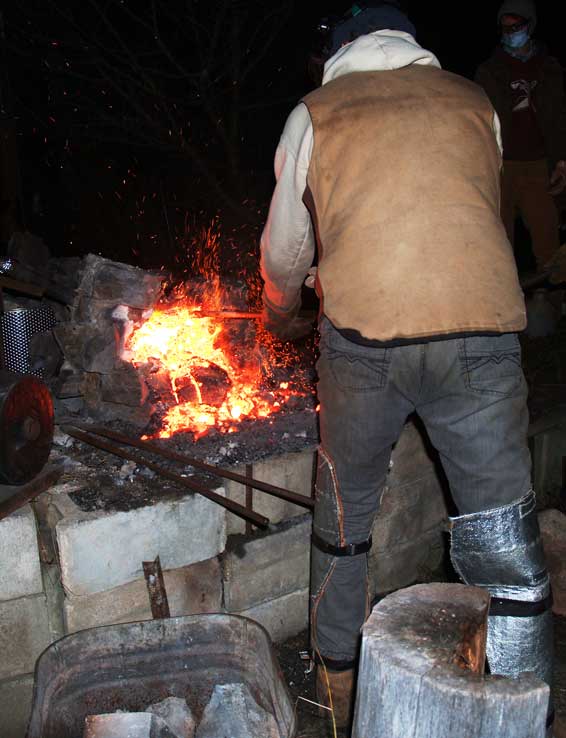 Starting to pull the bloom mass clear
It had already been decided that the only practical way to manage a
bloom of our imagined size would be to pull it clear of a basically
broken furnace, then forward down on to the lower level ground.
Although space was expected to be extremely tight, a thick disk of
wood had been placed on the ground to act as a compression surface.
The strikers would have to work on their knees for anything
approaching correct or effective hammering. A thick plank of wood
was placed edge up on the ground as a short fence to protect them
from the intense heat (and to stop fractured off pieces bouncing
into their legs). As I had assumed the honours of doing the actual
extraction, I would continue attempting to control the position of
the mass holding with tongs. Neil, Bram and Richard took the
available sledge hammers and donned gauntlets, aprons and face
shields.
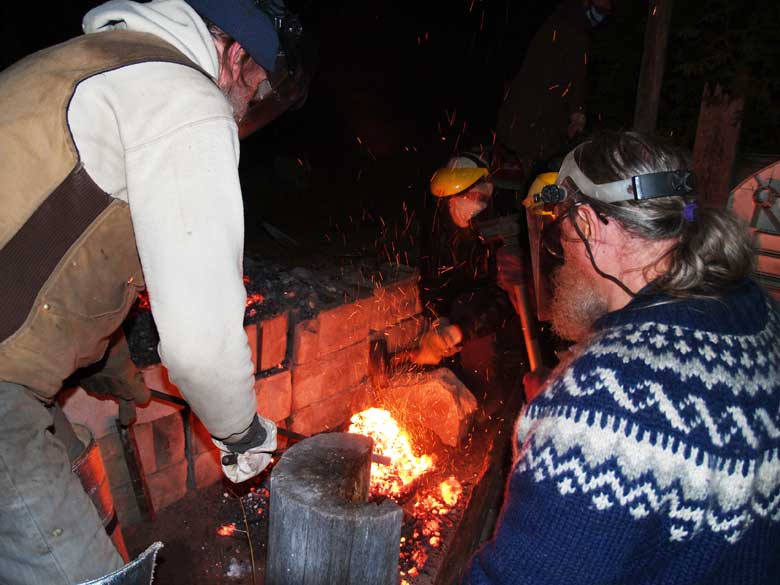
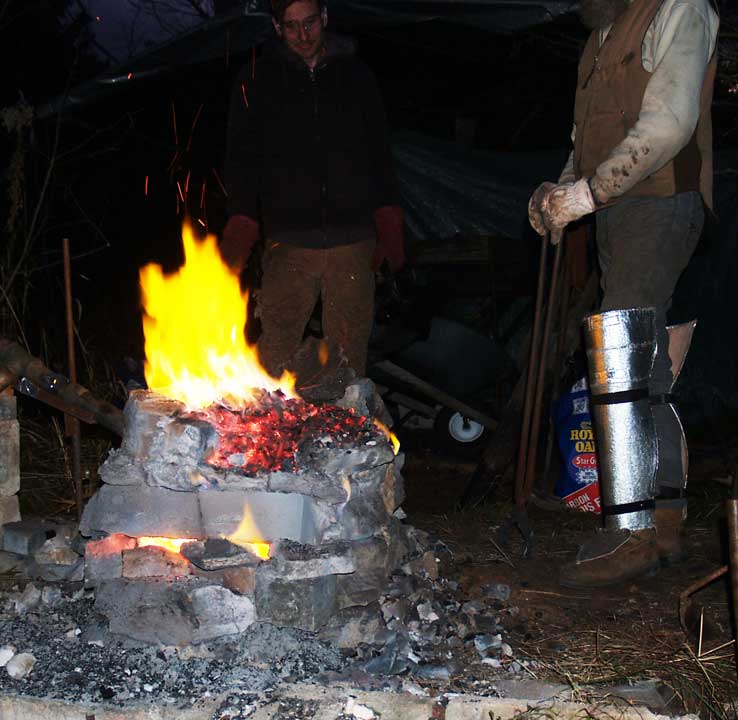
Hammer compacting the hot bloom
The second image above, shot from available light, is quite dramatic
- if obscured in detail. It does point out something quite important
- it was full dark by the time the bloom was extracted. An attempt
was made to rotate the mass so at least each of the potential 6
surfaces had a turn at being stuck while uppermost. It would become
clear that there was not a lot of additional slag clinging to the
outer surfaces after this cycle of hammering (roughly 9 - 12 strokes
between the three workers to each face).

Too Big! Attempting to fit the bloom
under the press working plates
As we usually do, the team made their guesses on the final bloom
weight. Perhaps with more experience (?) my own estimate was 15 kg.
As a side note on this smelt, we finished up our final 'closing
ritual' and major equipment packing up at roughly 8 PM, making the
total working time 12 3/4 hours.
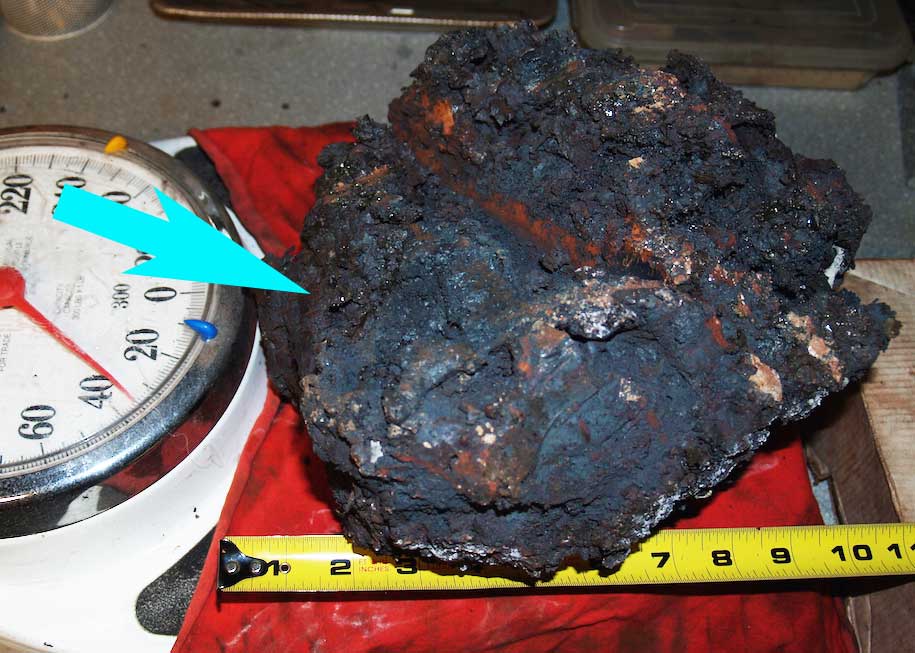 Weight of the finished bloom (next day)
The next day, still slightly warm mass was placed on a bathroom
scale. You can see the result above, 35 lbs / 15.9 kg. The top
surface is uppermost here, the (very) rough relative angle and
position of the tuyere is indicated by the arrow. You can see how
there has been a depression dug out of the one end of that top
surface, caused by the slag bowl forming a bit too high, and the raw
size of the mass itself. This placed the top surface too close to
the air blast, which has eaten it away. There is a clear lifted edge
on the side furthest from the tuyere, again a result of so much
metal piling up in the furnace interior. The initial interior
diameter at tuyere level was roughly 25 cm, and you can see that the
bloom measures about 22 cm front to back.
The yield result is ‘only’ 24.5 %, 15.9 kg bloom from 65 kg ore.
This is intact a bit lower than I expected. Usually high volume ore
smelts quickly ‘slam on the mass’ and result in significantly higher
yield percentages. To be fair, past uses of the same poorer quality
Virginia limonite have only produced yields in the 10 - 15% range,
and this ore comprised almost 30% of the total used in this smelt.
There also was a higher amount of forge floor sweepings than
normally used in the batch of DD1 analog prepared.
Even so, a roughly 25 % return is certainly quite acceptable. The
raw mass of the bloom is also one of the largest I have ever made.
Any image containing me ( * ) is by Kelly
Probyn-Smith
( 1 ) Some of the background research I did over January to August
2019 was used in the preparation of a lecture styled presentation
for the ‘virtual’ Woodford
Furnace Festival, on August 23, 2020. ‘West Viking - Iron
Smelting’ is available for view on YouTube
( 2 ) This not strictly true. At the later end of a smelt sequence,
charges are typically large, 1 : 1 with charcoal, or even
more. One problem right now is that with COVID, the normally
used 'Maple Leaf' brand via Home Hardware is completely out of stock
- and back ordered to at least Spring 2021. Recently Canadian Tire
was able to secure a bulk order of Royal Oak out of the USA. Neil
grabbed a large quantity, but stores quickly ran through that stock.
One thing we noticed is that although the bags are the same size,
the amount contained has shrunk, from the previous 20 lbs (9 kg) to
now 8 kg (17.6 lbs).
( 3 ) These totals may not add up to the full 86 smelts undertaken
by me personally to October 2020. In a number of cases, combinations
of ore types were used on a single smelt (recorded as .5 each).
Data about the various ores (iron / silica contents) can be found
here
( 4 ) Gromps are the slag and iron fragments that flake off an
extracted bloom during it’s initial compaction. These typically
small pieces are magnetically gathered.
( 5 ) This a method demonstrated by Michael Nissen during
the 2016 ARTEfakty event in Poland. Adding a quantity of iron rich
tap slag as the first charges quickly establishes a working slag
bowl, allowing the first reduced iron ore to go straight to
depositing a metallic bloom (thus improving yield).
( 6 ) When this
control system had been originally introduced (April 2008),
coupled with the high efficiency US Navy surplus blower just
acquired with help from Lee Sauder.
Using a small wind speed gauge, in line measurements were made and
volumes calculated. Various volumes were marked on the sliding
plate, roughly corresponding to increments of 100 LpM. It is these
numbers seen recorded on the smelt data sets after that date.
( 7 ) The objectives have been normally to test specific furnace
designs, mostly based on historic prototypes or variation in
methods. For that reason, most typically ore amounts have been kept
to the 25 to 30 kg range. Practically, if you can make a 3 kg bloom,
it is just more ore and charcoal (time) required to make a larger
bloom.
( 8 ) These hot stones certainly would have been pulled off and
dumped well out of the way of workers - for the same reason we were
collecting them together. Individual stones had quite differing
surface effects from the variation on temperature they were exposed
to, based on their location within the body of the furnace. Previous
measurements had shown that near the top of the furnace,
temperatures range about 800 C. Moving lower, as much as 1300 C was
certainly possible.
unless
otherwise credited - Text and photography © Darrell
Markewitz