Pewter Casting in Stone Moulds
this handout originally prepared for a workshop (some long time ago!)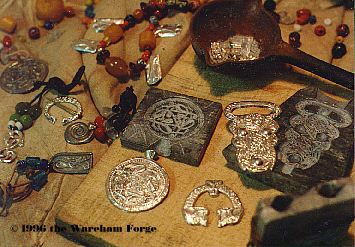
|
Historic Background : Pewter in the Viking Age The majority of jewellery objects remaining from the Viking Age are either made of silver or bronze. Silver is commonly found in massed hordes, with coins, ingots, fragments forming the largest portion rather than finished jewellery. These hordes are obviously collected wealth, hidden in times of peril by owners who never returned. The common medium of exchange was obviously silver, gold objects are relatively uncommon throughout Scandinavia. Although simple sliver objects are found, many show a very high degree of craftsmanship. Complex forming and assembling techniques are commonly seen with silver. Bronze items tend to be simpler in design and technique. Many are multiple copies of single originals made using the lost wax process. There is considerable range in quality in bronze jewellery, as shown by the wide range of quality in workmanship and design. If gold was the material of high kings, sliver for the wealthy, and bronze for the 'middle class' - it remained for pewter to fill the need for the simplest of ornaments. Pewter, an alloy of lead and tin, mimics the appearance of silver - at least when freshly cast. Not a large number of pewter artifacts remain from the Viking Age, if for no other reason that the material will quickly oxidize and decompose. What samples that have been uncovered are of the simplest workmanship. More clues to the use of pewter by the Norse can be seen the uncovering of many moulds suitable for producing objects cast in this material. Pewter has a relatively low melting point, in the range of 750 F, which is easily attained in a small fire with no special equipment or fire modifications. With a high lead content, the molten metal is fairly fluid, allowing for the use of open topped moulds, such as the antler sample found at Hedeby for a simple disk broach. More complex shapes can be produced through the use of carved stone moulds, such as the dragon mount mould found at Birka. In this case the carved block of soft slate or soapstone would be used in conjunction with a flat backing plate and poured from the edge. One of the advantages of this combination of stone mould and pewter is that literally hundreds of copies of a pattern could be easily made to offset the effort of the mould creation. This technique represents one of the earliest examples of a true 'mass production' process. 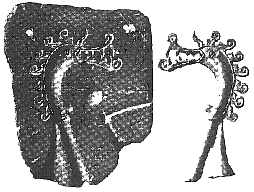  Reusable moulds. The first is of slate and is from Birka (shown with finished casting). The second is of antler and is from Hedeby. Images from 'The Vikings' pg 142. Materials: In modern times, the toxic effect of working with lead based alloys is avoided through the use of so called 'lead free pewter'. Sometimes also known as 'Britannia Metal 92', it is in fact primarily tin (usually 92%) with a small amount of copper and antimony (typically 6 and 2 % respectively). This combination raises the melting point from the ancient alloys and also results in a metal that is more viscous when molten. For this reason the moulds. must be edge poured for successful castings. (Note that although a 'lead free' pipe solder can be substituted for the proper metal, these alloys are even more sluggish when poured, allowing for only simple shapes to be cast with success.) Soapstone is the ideal mould material, combining ease of carving with very good durability with proper handling. A well designed individual mould should survive through well over a thousand castings! It is important that the soapstone be of the softer 'dark green' type, and should be as free of inclusions as possible. (The stone from southern Quebec is highly recommended.) Individual moulds. are carved into slabs roughly three to four inches square and about 3/4 of an inch thick. Tools: For the mould carving, almost any small knife will do, but experience has shown a 'wax carver' tool to be ideal. Roughing out shapes can be greatly speeded up through the use of a rotary shaft tool (such as a Dremmel) with a selection of carving burs. During the casting, any small heat source will do, a modern propane hand torch is ideal. In a historic setting, a small cooking fire is more than adequate. Some kind of metal ladle is required, a small cast iron one (often used for casting lead sinkers or the like) is the best. Finishing the completed castings requires the use of a pair of wire cutters to remove the 'button', plus a small file to trim any rough edges. Safety: During carving, a large amount of very fine dust is
produced. This is especially true with the use of
mechanical cutters, when the use of simple dust mask is
highly advised. Some protection for clothing is advised, a
simple apron is suitable. DURING METAL CASTING THE USE OF A FULL FACE SHIELD IS ABSOLUTELY REQUIRED!Any water that comes into contact with the molten metal will result in a steam explosion that can 'shotgun' molten metal out of either ladle or mould. This effect is extremely dangerous, especially to eyes and any exposed skin. All moulds. must be ABSOLUTELY bone dry before molten metal is poured. The wearing of gloves and a leather apron is also is required during casting.Mould Preparation:- Using a hand saw (or band saw if available) cut the
soapstone into thin slabs, each about 1/2 to 2/4 inch
thick. By allowing the weight of the saw do make the cut
(use speed , not force) a straight cut is easier to
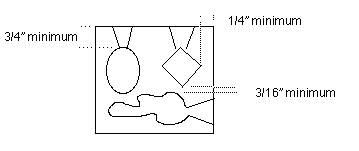
achieve. Carving - Layout the desired pattern on the block using a felt tipped marker. The top of each pattern should be no more than 3/4 inch from an edge to allow for the entry cone for the metal. The pattern should be no closer than 1/4" to the sides of the block. There should be at least 3/16 clearance between individual patterns. Several patterns can be cut into each side of the block. Special care must be taken when positioning the pattern - taking into account the even flow of the metal into the pattern. For example, squares are filled from a corner and any possibility of air pockets must be avoided. (Note that this is often more art than science, results will improve with experience.)
- For simple patterns, the best method is to first cut a
regular shape to an even depth and then inscribe a pattern
on top of it. Generally shapes from 3/4 to about 1 1/2"
across are most successful in this method.
- Care must be taken to ensure that the edges of the
pattern are not undercut - the top of the carving must be
wider than the bottom. (Otherwise the cooled metal will
lock into the mould.) This can be checked by holding a
straight edge at 90 degrees to the bottom of the pattern
at observing the edge of the pattern as shown. 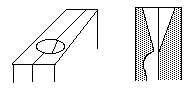 Casting : - The metal is most effectively heated by swirling the
torch over its surface. (Unlike ice, other solids will not
go fluid until the entire mass has reached the melting
point.) Finishing: - Once patterns cool, wire cutters can be used to clip
the button from the finished casting. These buttons can be
re-melted for new castings. Sources : Another site that has very good information concerning the process of pewter casting in stone moulds. is by 'Soncara' and can be found here . The best source for soapstone in blocks is a good quality art supply store. Sometimes this material will be available from suppliers who specialize in wood carving. I find the stone from Quebec, which ranges from a medium to dark green, to be the best. Ideally you want a softer grade of soapstone with a fine texture and as free of occlusions as possible. Prices are likely to vary considerably - shipping becomes a major element of the cost! (In Central Ontario, a 3 x 3 x 5" block of good quality soapstone runs about $15 CDN.) A couple of mail order sources for both soapstone and carving tools (available on line): Sculpture House Rio Grande Lee Valley Tools |