|
The overall project consists of three
separate elements :
|
Phase 1 -
Fence Extension
May 2011
 |
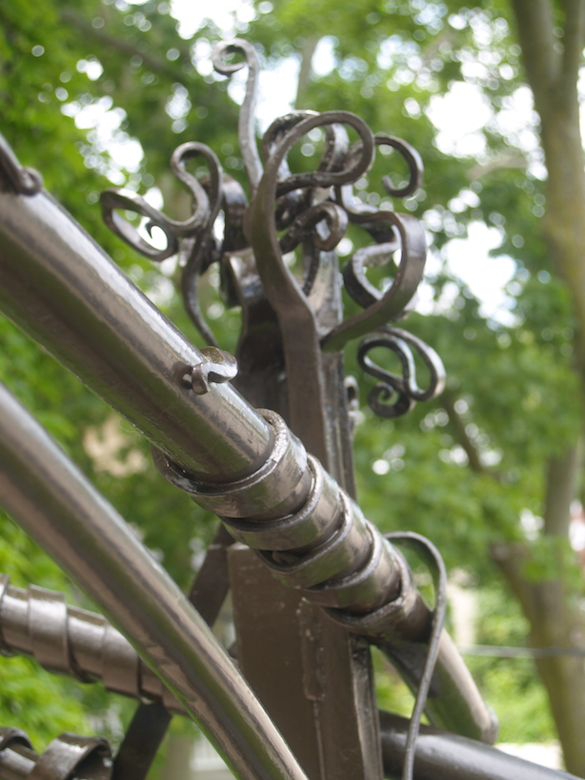
The customers had a board and batten
fence around the front and down the
driveway on their property. With a new
(young and energetic!) dog, they were
concerned that he would be able to jump
the existing fence. There are posts set
roughly every 8 feet, the fence boards are
cut on a sweeping curve in a sideways D
shape. The difference between the peaks in
the middle and the level at the posts is
about 12 inches.
Images by Karen
Peterson
|
 |
 |
As a an alternative to replacing all the
fence boards, they asked me if I could
work up a decorative metal extension in
increase the effective 'blocking' height
of the fence. My solution was to use a
horizontal line of 1 inch diameter pipe,
held above the existing fence top by a set
of decorative brackets. The intent is to
raise the line of the fence by 4 - 6 inch
at its highest point (so 16 - 18 inches
above the post area).
To fill the gap around the posts will
require placing a total of four brackets
(using a roughly 6 inch square grid as the
spacing guide). The pipe will consist of a
number of 8 foot pieces, with a small gap
just above the individual posts. This
allows for any sway to the fence line. It
will also make installation a lot easier,
even allowing to raise the height of the
pipe line should that prove necessary.
The individual brackets will be forged to
individual organic curves. The leaves hang
down below the top line, helping to block
the gap above the posts. I also wanted to
enhance the organic feel of the brackets.
For that reason I forged a separate
smaller 'tail' which will be welded to the
main structural part of each bracket.
To ensure there would be enough physical
strength to the support, I chose 1 1/2
wide by 1/4 inch thick flat stock. The
tails are forged from 3/4 or 1 inch wide
by 1/4 (roughly half of each width).
|
 |
 |
 |
 |
|
Support elements before
installation - total 62.
|
View from the sidewalk,
up the driveway.
|
Closer view, the rail
hangs behind the fence line.
|
|
|
Phase 2
- Porch Supports
December 2011
 |
The next commission was for a replacement
set of supports under the front porch.
The house is late 1800's, a nice 'short
two story' brick, what could be considered
an affluent farm house of the period. The
front porch covers the entry for the
original entry door, with a small balcony
above off the master bedroom. The original
sculpted wooden pillars have rotted out.
Part of the project has included replacing
some of the timber support beams
underneath.
The image to the left shows the original
wooden porch structure.
The image to the right has been altered
via Photoshop to remove the supports and
wooden picket railing. This as a starting
point to further design work.
|
 |
| |
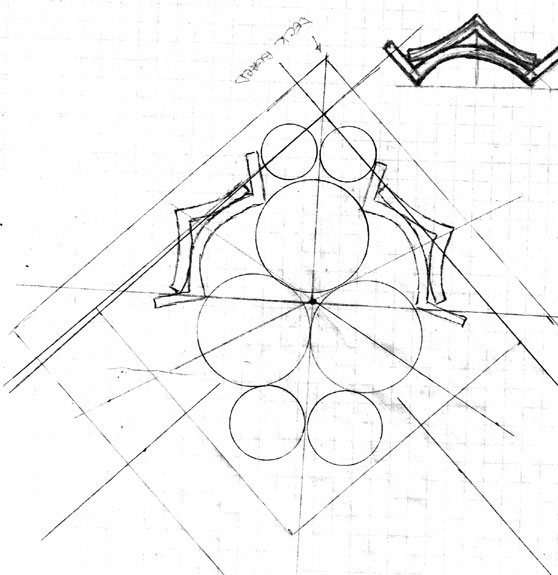
As with any project of this nature, there
is a structural component, plus an artistic
consideration. The first possibility was to
continue working in that theme - a design
based on the natural lines of vines with
large leaf end terminals. As usual, I sat
down with the clients and had them pour over
a number of book collections of contemporary
work by other artisan smiths. We marked
things they liked, with me making notes on
their specific comments. Later, I took a
more careful look at those pieces, narrowing
down the general outlines from all the
specific illustrations.
From this I was able to generate a number of
rough layouts. One specific structural
requirement was going to come to dominate
the possibilities - that there had to be a
strong vertical line of metal to support the
weight of the heavy porch roof and its upper
deck. In most cases, this reduced the visual
aspect of the potential designs to look too
much like 'a beam with stuff stuck on to
it'.
|
|
|

Runnels of slag - Slag
Pit Smelt 1 October 2011
|
In the end, I was struck by the potential
from something else entirely:
Neil has become my enthusiastic right hand
for the ongoing experimental iron smelts
here in Wareham. The massive slag block
produced in our 'slag pit' smelt in October
was composed of individual runnels of slag,
running downwards through a bundle of willow
sticks. Even at the time, we both remarked
on the artistic possibilities.
So I was struck by a potential design -
using a bundle of individual tubes, instead
of one major structural elements. In fact, a
bundle of smaller tubes would be *stronger*,
with the many side wall cross sections
combining to the load carrying capability.
Inspired by the folding and bulging of the
slag, individual tubes could be partially
flattened, twisted, folded or surface
deformed. The bundle would be both welded
and then wrapped with tendrils of round rod.
This would both massively reinforce the
welds, but also add an additional decorative
feature.
Of course - I couldn't really draw this
concept effectively!
Faster to make a sample piece...
At the right is the original sample,
composed of a total of five individual
pieces of pipe. The central core is larger
diameter (roughly 1 1/4 OD) and the outer
pieces of smaller (thus more flexible!)
pipe (roughly 7/8 OD). The sample is about
two feet long, and has tendril wraps of
3/8 round at either end. A number of
different forging techniques have been
used on the individual pieces. The
competed sample bundle is roughly four
inches wide.
|
|
|
|
At this point, I played some hoo-doo with
Photoshop.
- First I photographed the sample piece from
a number of different sides.
- I then spliced the images together to
create an impression of what a full sized
support would look like.
- I then scaled that image to fit the
proportions of the modified image of the
front of the house (with the existing
structure removed digitally).
Scaled from the four inch width, the bundle
just looked too small in proportion to the
rest of the structure. Next I played some
games with scale - and the result is seen to
the left. Here you see the bundle increased
in size so it 'looks right'. Measuring from
the known dimensions, the bundles should be
closer to six inches wide. (The total
height of each is roughly 8 1/2 feet.)
To the right is my design drawing for the
base section of the proposed supports.
A basic principle to follow is 'over
engineer everything'. The centre unit in
each of the bundles was a straight length of
2 1/2 ID schedule 80 mild steel pipe, with
roughly 1/4 inch thick side walls, which
would carry the actual load of the balcony.
The individual lengths of pipe that composed
the decorative elements were individually
forged to flattened segments, twisted, then
MIG welded to the central cores. Tendril
wraps of 1/2 round rod covered over the
welded areas, as well as contributing to the
overall effect.
|
|
|
|
|
|
|
|
Overall view of the
Pillars
|
Looking North on porch
|
Looking South, back
towards fence
|
Detail of Pillar
|
|
|
|
|
|
|
Top of North pillar - to
West
|
North pillar, from porch
|
Top of South pillar - to
West
|
South pillar, from porch
|
|
|
Phase 3 -
Balcony Railing
Fall 2012 - Summer 2013
|
|
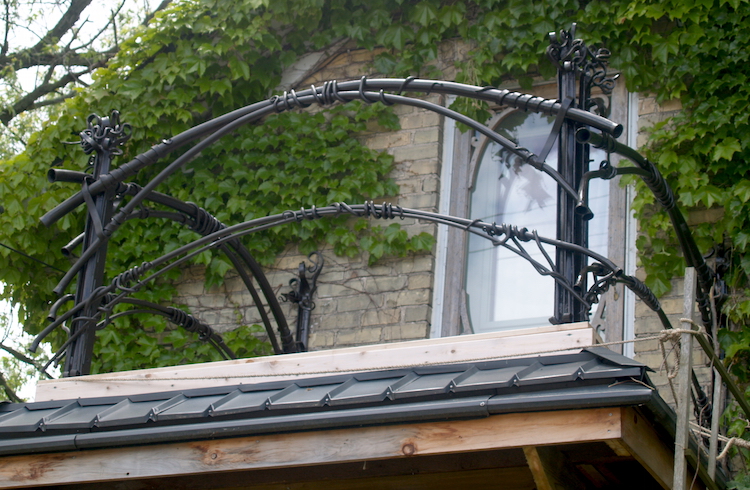
The final component of this project was a
replacement for the original wooden picket
balcony railing. The small balcony over the
porch roof was accessed from a door off the
bed room, and facing on to a busy street it
was rarely used. The home owners were both
middle aged adults, and so provisions for
children's safety was not a consideration.
As is usual, I had generated several rough
concepts, working inside the kind of organic
lines used for other portions of the
designs. The original concept was to make
the railing elements as a set of sweeping
curves.
|
|
|
The clients had been familiar
with my past work, especially the concepts
behind 'Paris
Metro', which had involved layering
structural steel profiles modified by hand
forging, which where cut apart into
individual lines at the ends.
Of course, what looks good on a drawing may
prove overly complex - and actually
difficult to fabricate when considered as
forming steps.
|

|
In the end it was decided to
use a simpler configuration for the
individual railing pieces, flaring the ends
but otherwise cut segments. The uprights
used a core of 2 " heavy walled tube as a
core, with additional elements of slightly
flattened angle laid inside channel welded
to the outside. Cut at the top ends, the
flat lines were extended to tendril wrap
around the rail pieces, with additional
wraps of 3/8 and 1/2 " solid.
The metalwork was finished
with hot galvanized underneath dark brown
enamel paint.
|

|
|
|
Further detailed in Blog
posts:
Sunday, March 06, 2011
Peterson Fence Project
Thursday, May 05, 2011
Peterson Fence - Installed
Saturday, November 26, 2011
Where DO Ideas Come From (3) - Peterson
House
Saturday, November 26, 2011
Forging the BIG Time (again!)
Saturday, December 24, 2011
Peterson House - Front Supports : INSTALLED
Saturday, July 6, 2013
Peterson
Balcony Railing
|